logotype
  • About
  • Residential
    • Special Cleaning
    • Carpet Cleaning
    • Window Cleaning
    • Deep Cleaning
    • Apartment Cleaning
      • Sofa Cleaning
      • Yard Cleaning
      • Roof Cleaning
      • Carpet Cleaning
    • Duct Cleaning
    • Upholstery Cleaning
    • Pool Cleaning
    • After Party Cleaning
  • Commercial
    • Office Cleaning
    • Hotel Cleaning
    • Hospital Cleaning
    • Mall & Shops Cleaning
    • Industrial Cleaning
    • Pharmacy Cleaning
    • Premises Cleaning
    • School Cleaning
  • Our Locations
    • Montréal
    • Westmount
    • Ottawa
    • Toronto
  • Contact
CALL US TODAY
  • About
  • Residential
    • Special Cleaning
    • Carpet Cleaning
    • Window Cleaning
    • Deep Cleaning
    • Apartment Cleaning
      • Sofa Cleaning
      • Yard Cleaning
      • Roof Cleaning
      • Carpet Cleaning
    • Duct Cleaning
    • Upholstery Cleaning
    • Pool Cleaning
    • After Party Cleaning
  • Commercial
    • Office Cleaning
    • Hotel Cleaning
    • Hospital Cleaning
    • Mall & Shops Cleaning
    • Industrial Cleaning
    • Pharmacy Cleaning
    • Premises Cleaning
    • School Cleaning
  • Our Locations
    • Montréal
    • Westmount
    • Ottawa
    • Toronto
  • Contact
logotype
logotype
  • About
  • Residential
    • Special Cleaning
    • Carpet Cleaning
    • Window Cleaning
    • Deep Cleaning
    • Apartment Cleaning
      • Sofa Cleaning
      • Yard Cleaning
      • Roof Cleaning
      • Carpet Cleaning
    • Duct Cleaning
    • Upholstery Cleaning
    • Pool Cleaning
    • After Party Cleaning
  • Commercial
    • Office Cleaning
    • Hotel Cleaning
    • Hospital Cleaning
    • Mall & Shops Cleaning
    • Industrial Cleaning
    • Pharmacy Cleaning
    • Premises Cleaning
    • School Cleaning
  • Our Locations
    • Montréal
    • Westmount
    • Ottawa
    • Toronto
  • Contact
bugs
Blog Uncategorized
By Fin Dittimi August 27, 2021

How to Keep Spiders and Bugs Out Of Your House

Let’s face it: bugs and spiders are revolting. That implies we want them to be as far away from our houses as possible. The summer months are especially awful for flies, mosquitos, and other creepy crawlies. Many of us prefer to leave the windows and patio doors open to let fresh air enter. However, this increases the likelihood of spiders and pests invading your home’s interior.

So, how can you keep those creepy crawlies at bay without utilizing chemicals that are hazardous to your family? Continue reading to find out!

  1. Screens

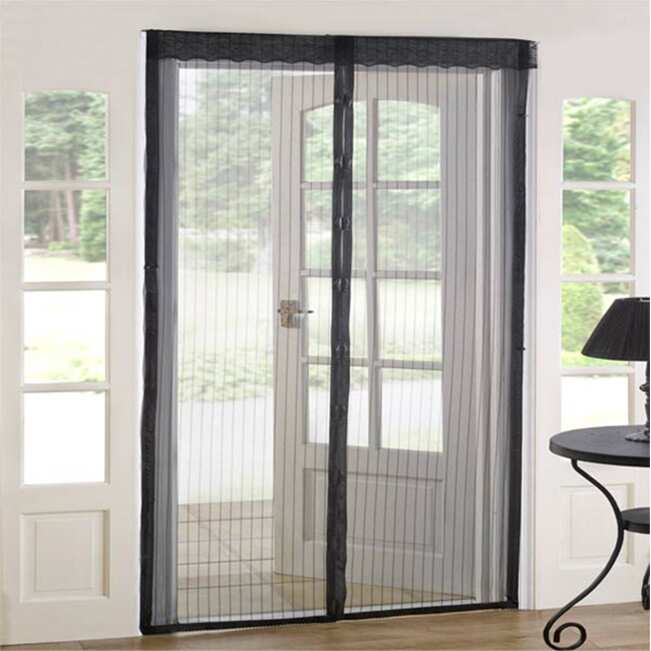
Patio screens may appear to be an expensive initial purchase, but they are well worth it. When your doors are open, these screens slide back and forth along the frames, acting as a barrier between you and the outside elements. Screens enable fresh air to enter your house while keeping insects and spiders outdoors, where they belong. If you don’t want to hire a contractor to install bespoke screens, you may simply buy a screen kit at large box home improvement stores.

  1. Peppermint Spray

Here’s an interesting fact: Bugs and spiders despise the fragrance of peppermint! Purchase some essential peppermint oil and spritz it about your home. If you’re having a barbecue outside, spray some at the base of the chairs and table as well. This will keep the pests at bay while also leaving your home smelling minty fresh!

  1. Insect-repellent coils

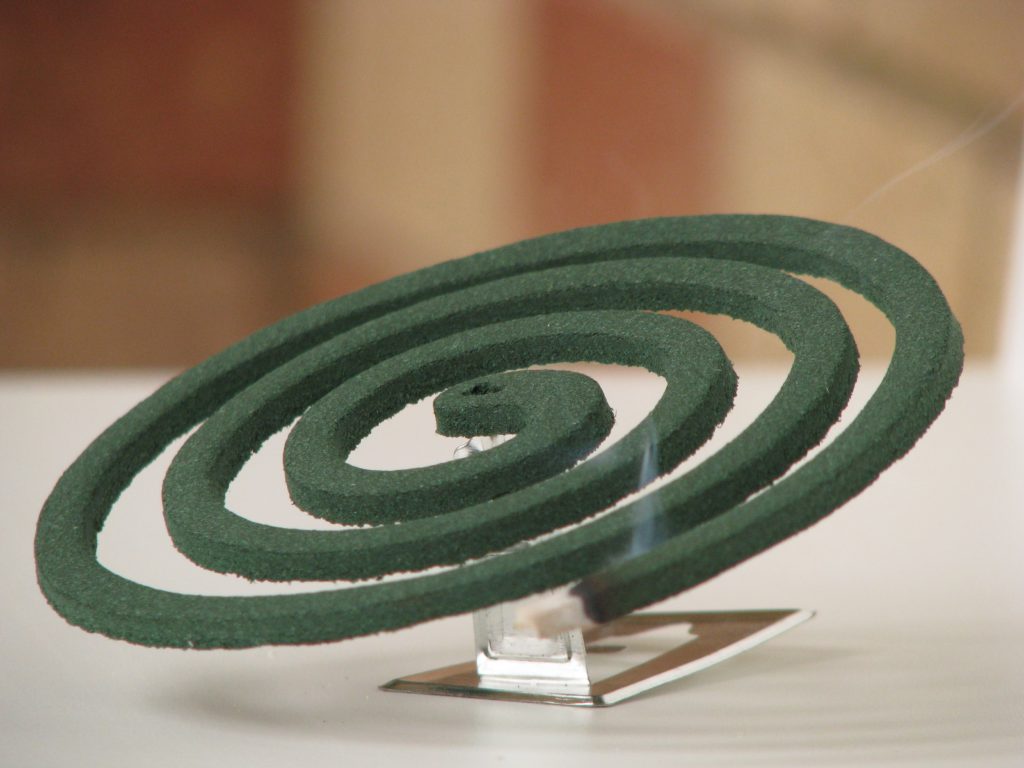
Mosquito coils are an excellent method to keep these pesky insects at away. These coil-shaped rings are lighted on one end and then burn to emit incense. As long as there is sufficient air circulation in your house, the odor will not be overwhelming or bothersome.
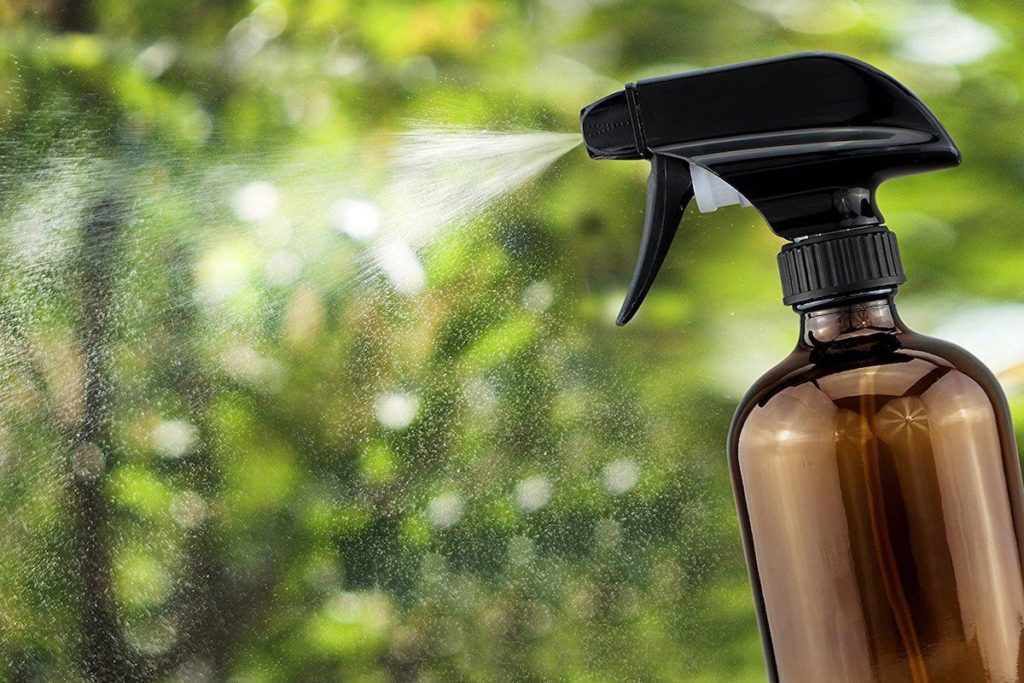
  1. Repellent Sprays

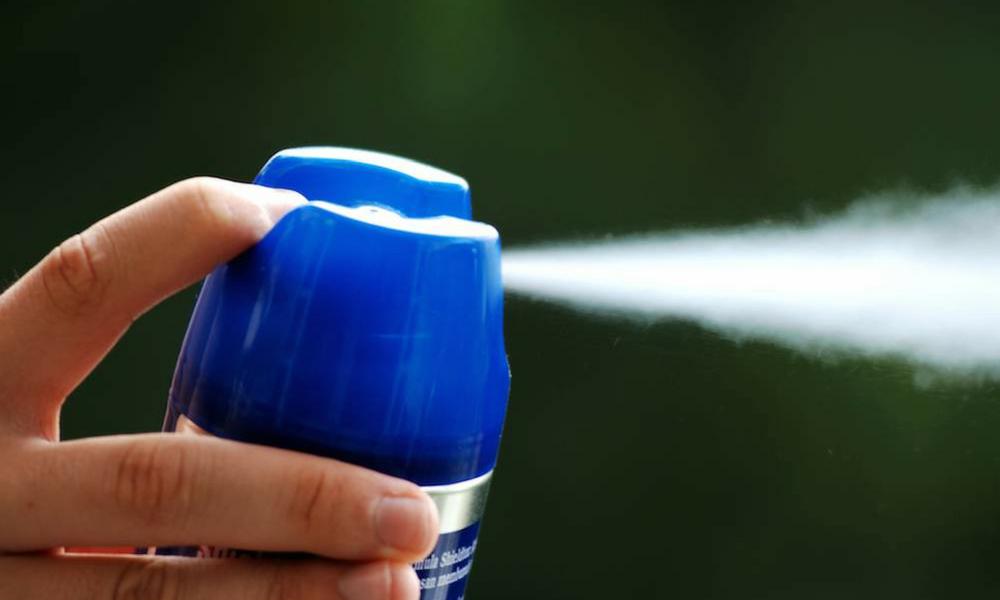
Popular insect repellents, such as OFF!, perform quite effectively. Purchase a household spray and liberally apply it on window sills, patio furniture, and baseboards. Spiders and bugs are known to congregate in these locations. Although the odor is imperceptible to humans, crawly critters are extremely sensitive and will avoid your home as soon as they smell it.

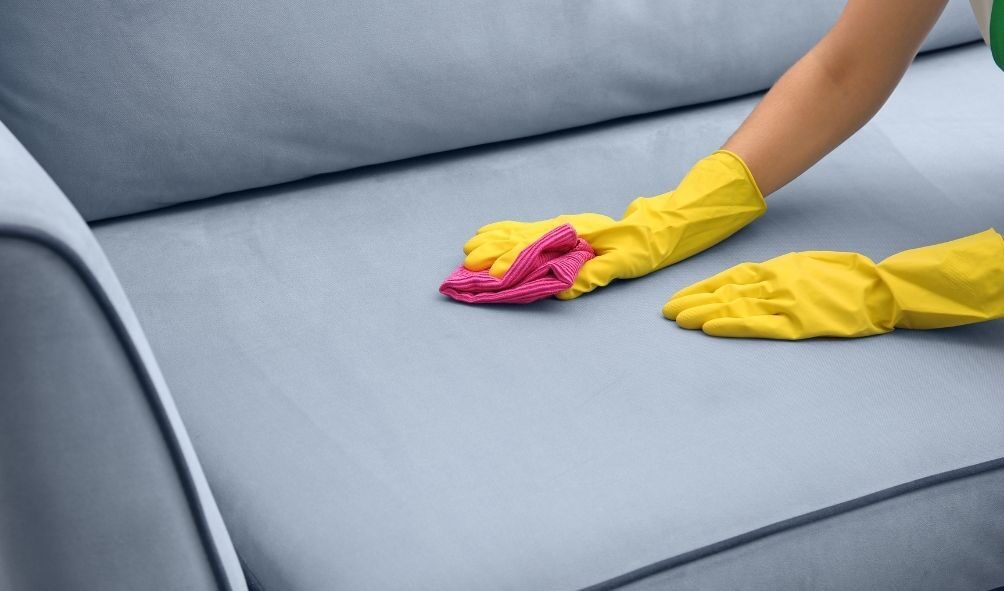
  1. Maintain a regular cleaning schedule.

It is well known that spiders and bugs prefer cluttered environments. This is why you must maintain a clean home at all times. Pests are attracted to leftover food, dirt, and dust. Keep them away by tidying up, especially after meals. Also, remember to take out the trash regularly and to avoid leaving domestic waste containers exposed for extended periods.

Contact us today for professional help

Call Us: 514.629.0841

Address: Montreal, Quebec, Canada

Mail Us: info@dialcleaningservices.com

READ MORE
upholstery cleaning montreal
Upholstery Cleaning
By Fin Dittimi August 27, 2021

How To Clean The Car Upholstery To Make It Perfect

Learn how to clean your car’s upholstery correctly with these valuable tips depending on whether it is made of leather, Alcantara, or fabric. It will be like new!

Car upholstery and carpets wear out over time. Without proper care, it is in these elements where the aging of the car’s interior materials is most appreciated. Extending the useful life of your car is as simple as following some basic recommendations, including keeping the interior of your vehicle clean and well-kept. ¿ How to clean upholstery? What cleaning tips to follow, whether it is made of fabric or leather? What should you do to keep the seats looking new?

It is not the first time that we have focused our attention on recommendations on how to clean the car so that both the interior and exterior of the vehicle are in perfect condition. Cleaning upholstery and seats are tricky: common sense, care, and sometimes some “grandma’s advice” for tough stains.

Basic upholstery cleaning tips

The care of our upholstery varies depending on the material with which it is made: fabric or leather. The main recommendation for cleaning fabric upholstery is to use water sparingly. The fabric absorbs excess liquid, making drying practically impossible and generating too much foam when combined with soap. The best recommendation for basic cleaning of fabric upholstery is to use a vacuum cleaner. If the dirt is heavier, a damp cloth with a mild detergent is recommended.

If the upholstery is made of leather, it is important to wipe it with a damp cloth with mild soap to remove the dirt. Then blot up the excess water or soap with a dry cloth. It is advisable to carry out a nourishing and brightening of the leather twice a year with a specific product to avoid deterioration of the leather and keep it in perfect condition for a longer time.

Three steps to cleaning the interior of the vehicle

Following three basic steps will help you to perform a good cleaning of the interior of the vehicle and the upholstery of the car. These are common-sense tips, but we also incorporate some homemade tricks to remove difficult stains, although when in doubt, always go to a professional:

Thoroughly clean the interior of the vehicle before focusing on upholstery. Remove all dirt, dust, and dried dirt or mud from carpets, trunks, and the interior. Eliminate the remains of bags, food, packaging, and all that we accumulate inside the car to clear the area and thoroughly vacuum seats, upholstery, dashboard, and instrument panel.

Choose cleaning products according to material and needs.

There are numerous cleaning products and foams on the market to deal with specific stains or for upholstery care. Find the one that best suits your needs, the stain and the care of the material. But whether it’s simple soap and water or a stain remover, remember to expand the product after removing surface dirt. Depending on the stain or the surface material, you can use a cloth, sponge, or brush.

The finish makes the difference.

Go over the surface to be cleaned and remove the foam or excess liquid with a cloth or a vacuum cleaner if it is small solid residues to offer a perfect finish.

Common mistakes when cleaning car upholstery

When faced with cleaning car upholstery, several common mistakes are often made.

Take time to clean stains.

The first of them is not to act as quickly as the stain requires. Don’t let the stain dry. Why? If the upholstery has been stained with grease, food scraps, gum … and you don’t clean it quickly, marks could remain. According to the experts, the most advisable thing is to quickly remove any stain that falls on the upholstery and do a thorough cleaning every one or two months.

Not all stains are the same.

Don’t treat all stains the same. Not all stains are the same and each of them must be faced differently. Popular wisdom and grandmother’s advice recommend that to remove a mud stain, it is necessary first to apply a thick brush to remove the main dirt and then with the wet brush to remove the remains.

  • If the stain is from tea or coffee, remove it as soon as possible with blotting paper, then rub it in with ice. For chocolate, use dry soap and rub hard.
  • Grease or oil stains are the most difficult. You can use diluted glycerin for removal.

If you are going to use a cleaning product, carry out a small test beforehand to avoid damage to the fabric, check the product’s effectiveness, and follow the instructions for use at all times.

How to clean the upholstery according to the type of material

There is no one-size-fits-all remedy for removing all stains from all types of surfaces; For this reason, it is important to follow some tips to clean the car upholstery depending on whether our vehicle has fabric, leather or Alcantara upholstery.

Fabric upholstery

To clean a stain from fabric upholstery, start by removing surface dirt. The best way to do this is utilizing a very powerful vacuum cleaner, so if we don’t have one at home, it is better to go to a gas station or car wash that offers this service. It is important to do it from the inside out of the seat to drag the dirt easily. And put interest in the folds of the seats since it is where more debris can accumulate.

After vacuuming up the solid remains, it is time to clean the stain. To do this, we will get a sponge and wet it with water and neutral soap to clean the seat. As in the previous case, it is important to do it from the inside out. It is usual that, once we have passed the sponge, the stain has not disappeared. In that case, we can get a special dry foam for cars that we can find in any store dedicated to the vehicle or on any surface.

It is applied on top of the stain, allowed to act while it dries and, after the time indicated by the manufacturer, is removed with a dry cloth. The effects are usually magnificent, and we will only have to wait for the car to dry and to ventilate. The faster it does it, the better, so we can use a vacuum cleaner or, if not, try to leave it somewhere where it is safe for it to remain with the windows down or the doors open so that the odors disappear as soon as possible.

Leather upholstery

When it comes to cleaning a stain on leather upholstery, the process is similar, although with some nuances. As in the previous case, the first thing is to make us use a vacuum cleaner to remove any solid remains on the surface or between the folds of the seats. Then you have to use a soft brush to remove any dust on the seats, but be very careful not to damage the leather.

Next, you must apply a specific cleaning product for leather upholstery found in supermarkets, gas stations, or specialized automotive stores. You have to use it by making circles with the same soft brush that we mentioned earlier. We must remove the excess remains of the product with a damp cloth or, if possible, with a microfiber cloth to take care of the skin.

Finally, we dry the stain and apply a nourishing cream to the leather. It is a process that is recommended to be done at least twice a year in all cars with leather upholstery to keep the leather in perfect condition. To apply it, it must also be done in circles, using, in this case, a dry microfiber cloth. The result will be perfect.

Alcantara leather upholstery

More and more cars have the so-called Alcantara fabric upholstery. This synthetic fabric has become very popular among manufacturers due to its great qualities: it is very resistant and, at the same time, allows to offer an infinity of colors to the customer.

For people whose car already has this type of upholstery, their thing is to follow the same steps as in leather upholstery. However, they should replace the specific cream for leather with another cream recommended for Alcantara upholstery. The results will be excellent and it will be like new.

Cleaning the car upholstery is as simple as following a few simple steps:

  • Remove superficial dirt with a good vacuum.
  • Act quickly on the upholstery.
  • Prevent the stain from drying for a better result and choose which cleaning product to use on the seats since the material from which they are made.
  • Be it leather, fabric, or synthetic.
  • Imply extra care.

At Dial Cleaning Services, we are experts in upholstery cleaning in Quebec, Canada. So you can contact us to have a clean space and create a more pleasant climate in your company.

You may also like:

  • How to clean your new home before moving in
  • COVID-19 Disinfecting Services
  • How to clean tall windows in 5 steps
READ MORE
hjhg
Blog Uncategorized
By Fin Dittimi August 25, 2021

Washing Machine Cleaning Tips

While most individuals rely on washing machines to keep their clothing clean, just a few prioritize washer cleaning. Your machine, like your clothing, has to be cleaned regularly. Some individuals believe that the detergent they use to clean their clothing also cleans the washing machine. On the contrary, certain detergent residues may contaminate the machine. Laundry dirt, hard water, and chemicals can all produce a buildup in the washer’s inner workings.

Your washing machine will begin to smell if it is not properly cleaned. Leaks, poor cleaning outcomes, and damage can all be caused by poor maintenance. So, how do you keep your washing machine clean and operational? Here are some of the best house cleaning methods you may use monthly. Let’s start with what you’ll need for the job.

Tools

  • Toothbrush
  • Microfibre cloth
  • Towel or cloth
  • Soft brush

Materials

  • Baking soda
  • White vinegar or bleach.

1. Empty the Laundry Detergent Drawer

Remove the detergent drawer before cleaning a front-loading washing machine. Excess detergent can build up in detergent drawers, clogging drains over time. It is also a breeding ground for bacteria and might pose a health risk. A soiled detergent drawer might harm the way your clothes are cleaned. Remove the detergent drawer and soak it in warm water to achieve the greatest results. Then, using a toothbrush, remove any remaining residue. Don’t forget to clean out the cavity as well. After cleaning, apply an antibiotic spray to eliminate any remaining germs.

2. Remove and clean the door seal or rubber gasket.

Before cleaning the drum, clean the rubber bands that run over it. The rubber gasket attracts fluff from clothing and, if allowed to accumulate, becomes difficult to remove. To achieve the best results, clean the seal with a wet cloth before and after each wash to guarantee that your machine does not take up new filth every time you use it. Scrub anything that clings to it and spray the bands with an antibacterial disinfectant during your regular monthly cleaning regimen.

3. Wash the Drum

Even though the inside of the machine seems clean, you should still clean it since some numerous nooks and crevices might harbor bacteria. The simplest approach to ensure it is clean and germ-free is to run an empty wash after a few months. Combine the baking soda and hot water in a mixing bowl, and then set the machine on the hot water cycle. This will disinfect the washer and eliminate any unpleasant odors. You may also substitute vinegar for baking soda. After finishing the wash, keep the machine door open to allow the drum to dry.

If you have dogs in your home, there is a good probability that your machine retains pet hair. The quickest approach to remove pet hair is to let the drum dry fully before vacuuming it out with a gentle brush.

4. Examine the Inlet Hose Filter

The filter keeps dirt, tissues, hair, and minerals from contaminating your cycle. If left unchecked, it might clog, preventing the free passage of water into your washer for a new cycle. The filter is usually located at the front of the washing machine, concealed by a hinged cover.

Turn off the water and remove the hatch to clean the filters (hinged cover). Remove anything that has been collected on the filter. Additionally, inspect the cavity to ensure that any trapped material has been removed. Then, using a cloth or a dish towel, clean down the filter.

5. Clean the Outside

When you’re through cleaning the interior, don’t forget to wipe the surface of the washing machine with a moist towel. Avoid using solvents or abrasive cleansers, which can harm or scrape the appliance’s surface.

6. Consistent Cleaning

Cleaning your washing machine regularly is one of the most basic, but useful, housekeeping recommendations. A custom machine cleaning cycle is included in the majority of modern washing machines. If your machine does not have a personalized cleaning plan, add chlorine bleach into the dispenser and perform an empty wash with hot water. You can also use specialized cleaners.

It is not necessary to clean the washing machine fully after each wash. However, there are a few simple steps you can do to ensure the washer operates properly in between usage. Remove all clothing immediately after each wash. Emptying the washing machine after each cycle prevents odors from forming in the washtub. The odor is easily transmitted to your clothing. In addition, you should keep the door slightly ajar to enable free passage of air, which will help to dry off any leftover moisture.

Conclusion

It makes no financial sense to invest a lot of money on a washing machine and then ignore it. Use the following home cleaning techniques to ensure that your machine decontaminates your clothing for many years. Cleaning your washing machine regularly will not only keep it operating but will also save you money on repairs.

Before using the following home cleaning suggestions, be sure to read your washing machine’s user handbook. Use the proper detergent as well. Powder detergents are typically the best option. Some hand wash detergents, such as liquid softeners or additional suds, may leave residue on your automated washing machine, reducing its lifetime.

If you are unable to keep a regular cleaning schedule, you might consider hiring a cleaning service.

Contact us today for professional help

Call Us: 514.629.0841

Address: Montreal, Quebec, Canada

Mail Us: info@dialcleaningservices.com

READ MORE
rtdf
Blog House Cleaning
By Fin Dittimi August 23, 2021

How to Clean Curtains

Cleaning the curtains is an often-overlooked duty when it comes to general cleaning, partly because they’re easy to overlook because they’re out of the way, and partly because most people expect it to be a time-consuming and irritating process! That being said, it’s critical to maintain your curtains clean because they collect all kinds of aromas in your house over time, which can lead to bad odors and discoloration.

Cleaning your curtains, fortunately, does not have to be a time-consuming process. We think you’ll be surprised at how simple it is once you know how to!

Washing Machine

Many people are unaware that most curtains may be cleaned in a regular laundry machine in the same manner as your clothing. This is particularly true of thicker curtains. Use cold water and the delicates cycle to preserve the colors and designs.

Whatever you do, avoid putting wet curtains in the dryer after they’ve been washed, since this can permanently misshape and damage them. Hang them outside if possible (away from the sun to prevent discoloration).

Hand Washing

If your curtains are 100 percent cotton or contain features like fringes or delicate stitching, hand-cleaning is the way to go. Because curtains take up a lot of room, the bathtub is a much better location to accomplish this than the sink. Use a mild washing soap, or even better, a detergent made specifically for curtains.

Steam Cleaning

If you’re working with particularly heavy material or just don’t want to take down and reinstall the curtains, steam cleaning is an excellent choice. Simply begin from the top and work your way down, keeping the curtains as straight as possible. If you see the cloth becoming moist, move the steam cleaner back a little.

Curtains should be cleaned regularly

Maintaining your curtains regularly will make cleaning them much easier when the time comes. Rather than allowing dust to accumulate for months and months, including the curtains in your weekly vacuuming routine.

Another excellent tip is to let them air out in the breeze every couple of months. This will remove a lot of the smells they may have accumulated.

Finally, avoid odor absorption for the first time by adopting steps such as closing kitchen doors when cooking and never smoking indoors.

Contact us today for professional help

Call Us: 514.629.0841

Address: Montreal, Quebec, Canada

Mail Us: info@dialcleaningservices.com

READ MORE
Stainless-Steel-Cleaning
Blog House Cleaning
By Fin Dittimi August 20, 2021

STAINLESS STEEL CLEANING

Stainless steel appliances are one of the most popular kitchen trends in recent years and for good reason. Stainless steel goes with everything, it’s ultra-modern and elegant, and it looks brand new for years! However, if left untreated, it is renowned for displaying every single smear and fingerprint.

Fortunately, we’ve compiled a list of cleaning techniques for stainless steel appliances so they always appear as gleaming as the day you purchased them!

Microfiber

When it comes to stainless steel, traditional paper towels and dish rags will just leave it streakier than when you started! Invest in a pair of microfiber towels for cleaning, and your appliances will remain gleaming and new.

Follow the Grain

When wiping anything off stainless steel, it is critical to follow the grain of the surface. Otherwise, not only will streaking occur, but dust particles will become entangled in the surface as well.

Window cleaner

It isn’t only for glass, people! Window cleaners are an inexpensive and risk-free solution to clear most smudges and spills off stainless steel equipment. There’s no need to overdo it; a few sprays and a good wipe or two will generally suffice. Any more than that will result in more streaks than you began with.

Oil

It might sound counterproductive to remove the oil of fingerprints with even more oil but trust us. It works! Rub a bit of mineral or baby oil over the streak, and absorb any extra residue with a dry cloth.

Eco-friendly

If you’re looking for an eco-friendly or even homemade option, there are plenty of ways to skip out on the stronger store-bought chemicals. The easiest, cheapest, and most accessible option? Vinegar. There’s no need to dilute it, just transfer it to a spray bottle, and use it the same way as any other all-purpose cleaner. You can always add essential oils or lemon juice to cut some of the tangy vinegar smell.

Baking soda is another solution for stubborn stains. Combine it with a little water to form a paste-like mixture, then massage it into surface spots using a moist towel or dish brush. Once all dirt has been gone, properly rinse it with water, shine it up with vinegar if desired, and dry it with your microfiber towel.

We guarantee you’ll be blown away by how gleaming your stainless appliances are!

Check out our EcoFriendly Cleaning Service In Quebec, Canada.

Contact us today for professional help

Call Us: 514.629.0841

Address: Montreal, Quebec, Canada

Mail Us: info@dialcleaningservices.com

READ MORE
9-HOUSEHOLD-ITEMS-YOU-MIGHT-OVERLOOK-CLEANING
Blog House Cleaning
By Fin Dittimi August 18, 2021

9 HOUSEHOLD ITEMS YOU MIGHT OVERLOOK CLEANING

Though it requires a significant amount of effort, performing a comprehensive, deep cleaning of your home is eventually quite gratifying. Everything is as good as new, and you may enjoy the pleasure of a job well done. However, there always seem to be a few items around the house that you forget about while conducting a general cleanup,post-renovation cleaning or that appear too tough to clean in the first place. Here are nine domestic places or things that often go unnoticed and the best techniques to clean them.

Yellowed Pillows

You most likely wash your pillowcases on a regular basis, but what about your pillows? Sweat and hair products can soak down through pillowcases, causing old pillows to become yellow. Fortunately, pillows are simple to clean. Here’s how to have yours spotless in no time.

  1. Remove all pillow coverings.
  2. Place two in the washing machine at a time.
  3. Using liquid detergent and bleach, wash on a hot cycle with an additional rinse.
  4. Dry according to the tag’s instructions, adding tennis balls to the dryer to agitate them, and expose all surfaces to the heat.
  5. If there is any remaining wetness, allow them to dry fully before replacing the pillowcases.

Window Blinds

Blinds accumulate dust rapidly, yet they appear to take an eternity to clean. That doesn’t have to be the case thanks to this easy method that makes creative use of your kitchen tongs.

  1. To make two thinner strips of fabric, cut a dusting cloth in half.
  2. Wrap each strip around the ends of the kitchen tongs and secure it with rubber bands. Trim the fabric strips if they become too bulky when wrapped.
  3. Continue cleaning the blinds by pinching one slat at a time between the cloth-wrapped tongs and moving it horizontally.
  4. When finished, just remove the towel and return the tongs to the kitchen. Take care to thoroughly clean them before using them to pick up the food!

Vent Covers

All of the air passing through the vent covers collects more dust and filth than you’d think. These covers can be tough to clean while attached to the vents, but remove them and the operation becomes much easier.

  1. Remove the vent cover. Make a note of where you put the screws.
  2. Using a paper towel, wipe off the slats.
  3. Place the vent cover in the top rack of your dishwasher and perform a water-only cycle.
  4. To test it, wipe the cover with a towel.
  5. Do you remember those screws? Use these to reattach the vent cover, and you’re done.

Couch clothing

Because the fabric has a porous surface, dirt, stains, and smells sink in and cannot be easily removed. However, because sofas are common locations in the home for people to rest and gather, any comprehensive cleaning must include them. Some sofas have detachable coverings that may be cleaned in the washing machine. If it is your sofa, simply follow the directions on the tags. If not, you can use baking soda to remove stains and eliminate the odor of an old couch.

  1. Remove any human and pet hair from the fabric-covered areas of the couch using a stiff brush.
  2. Sprinkle baking soda on any stains or dirty patches of cloth.
  3. Allow for a 20-minute rest.
  4. Suck up the baking powder with a handheld vacuum or hose attachment.
  5. Use a clean cloth to apply a mild all-purpose cleaning to all fabric surfaces. Stains should be easier to remove.

Electric stove burners

Cleaning the burner rings on an electric stove may appear to be a difficult process. They rapidly get black from dirt and corrosion. However, you can bypass all of it with a few simple actions.

  1. Remove the burner and set it on a towel or another work surface.
  2. Use degreasing dish detergent and a paper towel to remove as much dirt as possible.
  3. Make a paste of baking soda and water and apply it to the burner’s top surface.
  4. Allow for a 20-minute resting period.
  5. Scrub away the baking soda paste using a sponge’s rough side.
  6. Rinse well and pat dry.

Glass Cooktops

What if your stove doesn’t have any burners to remove? The cooking surface can still acquire unattractive rust and dirt rings. Fortunately, you can clean a glass cooktop using the same materials listed above.

  1. Apply baking soda liberally to discolored spots and spread evenly with your fingertips.
  2. Soak a washcloth or hand towel in a water-and-degreasing-dish-soap solution.
  3. Squeeze the soap and water solution over the baking soda and lay the cloth over the stove.
  4. Allow for a 20-minute resting period.
  5. Pick up the cloth and scrape away the loosened filth.
  6. Remove any extra baking soda paste with a paper towel to leave a glossy finish.

Area rugs

While most people use a steamer to clean their carpets at home, many rugs may be cleaned with simply soap and water. When you notice stains on your favorite area rug, take it outdoors and perform the following:

  1. Hose down the rug, making sure it is uniformly saturated.
  2. Pour OxiClean or a comparable cleaner over the rug and scrub with a stiff-bristled brush, paying special attention to any discolored spots. Check the label to see if any compounds should not be used on your specific rug.
  3. Allow sitting for 2-3 hours.
  4. Use the hose to rinse the rug, ideally with a sprayer attachment.
  5. Roll the rug up, squeezing out any excess water and cleaner as you go.
  6. Step 5 should be repeated, squeezing out even more water.
  7. Allow the rug to air dry. Return it to its original indoor location after it has dried fully.

Toilet Siphon Access

Your toilet’s siphon maintains a consistent water level in the bowl and prevents it from overflowing. The siphon’s opening is towards the rim of the bowl, and it may have hard water or rust streaks. Follow these steps to get rid of the stains:

  1. Remove the toilet tank’s lid.
  2. Turn off the water supply to the toilet.
  3. To empty the tank and bowl, flush the toilet.
  4. Completely cover the toilet siphon opening with one or more strips of duct tape. The objective here is to create a good seal.
  5. Pour several glasses of white vinegar into the tank.
  6. Allow sitting overnight after flushing. The duct tape will keep the vinegar in the siphon hole, allowing it to dissolve the discoloration.
  7. Remove the duct tape, turn on the water, and use the toilet as usual.

Clean Your Brooms

When was the last time you cleaned your cleaning supplies? You may not realize it, but your broom may get very filthy after a time. When you’re through sweeping, give your broom some love. To get it as clean as possible, use any or all of these ways.

  1. Step outdoors with the broom and sweep away any excess dirt or pet hair.
  2. Vacuum the end of the bristles with a handheld vacuum or a vacuum with hose attachments.
  3. To clean the bristles, use a disposable disinfectant wipe.
  4. Add a little amount of degreasing dish soap to a pail of water and swirl to generate foam. Place the broom, brush side down, in the bucket, and soak for one hour.
  5. Don’t forget your dustpan while you’re at it! A squirt of multipurpose cleaning and a quick wipe-off should suffice.

A thorough deep clean may do a house a lot of good, but the entire process can be daunting at times. If you follow these suggestions yet still need assistance, contact us at Dial Cleaning Services for professional help.

Contact us today for professional help

Call Us: 514.629.0841

Address: Montreal, Quebec, Canada

Mail Us: info@dialcleaningservices.com

READ MORE
HOW-TO-CLEAN-YOUR-MIRRORS-PROPERLY
Uncategorized
By Fin Dittimi August 16, 2021

HOW TO CLEAN YOUR MIRRORS PROPERLY

Have you ever noticed that your mirrors are usually the first item to get dirty in your house? These lovely objects always seem to get stains, dust, or fingerprints on them. How many times have you checked your reflection just to get sidetracked by some blemishes on the mirror?

Nothing ruins the appearance of your home like a filthy mirror. It may make your bathroom and house appear disorganized. A clean mirror is one of those small touches that can make a big difference in your house. A glossy and streak-free mirror may better reflect light around your home, making everything appear brighter and more prominent. It’s surprising how much of a difference a clean mirror can make in your room.

Unfortunately, knowing how to clean a mirror properly is not always straightforward. If you don’t use the proper technique, you might end up with a muddy, streaky mess on your mirrors.

There are numerous things you should not do while cleaning your mirrors, including:

Wiping steamy mirrors with a towel after a shower: While some people believe this is a beautiful method to remove all the dust and grime, it will just make your mirror appear worse for wear. This is because towels frequently leave dust behind. This method can potentially leave streaks on your mirror if you don’t use a good glass cleaner.

Using a newspaper to clean your mirror

While using a newspaper to clean your mirror was previously a dependable method, the ink from modern-day papers might leave residue behind. This may result in a streaky mess on your mirror.

Wiping your mirrors with a paper towel: Unfortunately, paper towels sometimes leave behind tiny particles of dust. Instead, you’ll need a lint-free cloth.

Using chemicals that aren’t intended for window or glass cleaning: If you notice that your mirrors and glass have a foggy appearance, you know you’re not using the appropriate cleaner for the task. Anything labeled as a glass cleaner has specific ingredients that will not leave streaks behind.

While avoiding these techniques is beneficial, there are a few more measures you can take to clean your mirrors properly.

Tips for Getting a Streak-Free Mirror

One of the most crucial elements of cleaning your mirror is the instruments you use. This does not imply that you must spend a lot of money on new cleaning supplies and equipment. Some of these items may already be in your house. Take the following items with you:

  • Microfibre cloths: Use flatter ones because thicker ones might collect lint and leave it behind, therefore spoiling your clean mirror image.
  • Cleaning solution, such as glass cleaner or a basic water-vinegar mixture
  • The cotton pad
  • Using rubbing alcohol

Now that you have the proper equipment, it is time to learn the proper method. There are several strategies and procedures that individuals claim will work yet do not. Here is a five-step procedure on which you may rely:

  1. Begin with the most cluttered area of the mirror. This includes dried-on toothpaste, hair products, and so on. Pouring rubbing alcohol on a cotton pad and wiping away the dirt is the best way to remove it. You may need to use a lot of elbow grease to get the buildup off, but be careful not to harm the mirror. It is critical to work rapidly since rubbing alcohol dries quickly. Consider this the pre-wash step, which is comparable to addressing stains on your clothes before putting them in the washing machine.
  1. After that, spray your cleaning solution on the mirror. The key is not to overdo it – just a little mist will suffice. If you put too much on the mirror, it will begin to leak, creating an even bigger mess for you to clean up.
  1. After you’ve sprayed the mirror with mist, grab a microfiber cloth and fold it twice. This provides you with a couple of layers to work with during the cleaning process.
  1. Starting at the upper, left-hand side of the mirror, wipe the cloth to the right. Then, without raising your cloth, wipe back to the left while maintaining a downward angle. Continue wiping in this way until you reach the bottom of the mirror. It should be a zigzag or Z-pattern to make it easier to follow. If your cloth gathers too much dust or solution, fold it again and utilize a drier and cleaner corner of the microfibre cloth.
  1. Finally, examine your mirror from various angles to check if there are any stains or streaks. Buff these out using a clean side of your microfiber cloth and a little cleaning solution. However, don’t reapply the solution to the mirror during this stage. Instead, spray it on a clean towel and gently wipe away the streak.

This procedure may be used regularly on any mirror or glass in your home. It should provide you with streak-free cleaning for a long period.

Conclusion

If your mirrors are one of the first things to become dirty in your home, or if they constantly appear to have streaks, dust, or fingerprints on them, there is a correct technique to clean them and get your mirrors gleaming.

Mirrors are one of those subtle ornamental elements in your house that have far more influence than most people think. If your mirrors are unclean, they may create the appearance that your home is disorganized. On the other hand, Mirrors may give light and depth to your area if they are well maintained. It’s astonishing to see what a difference a clean mirror can make.

Contact us today for professional help.

Call Us: 514.629.0841

Address: Montreal, Quebec, Canada

Mail Us: info@dialcleaningservices.com

READ MORE
lash
Blog Uncategorized
By Fin Dittimi August 13, 2021

5 WAYS TO CLEAN YOUR FREEZER

Clean your freezer entails more than merely removing food and allowing it to thaw. There are a lot of stages involved in getting it done correctly! Here are five cleaning suggestions for your freezer to guarantee its maximum functioning over time:

Turn off the freezer

The first step in cleaning your freezer is to turn it off. This reduces the possibility of electrical shock and other damage while your freezer defrosts.

Because shutting off your freezer may cause it to defrost, position it in a location where excess water will not damage the floor or other appliances. If required, lay towels or old newspapers below it to absorb water.

Take out all the food.

Please remove all of the food from your freezer after turning it off to prepare for the major clean-up. Place all food in the refrigerator or another freezer to keep it cool while you clean. Fill plastic storage bins or big containers with lids with frozen food. You may avoid \early defrosting by keeping food in airtight containers when the food is returned to the freezer, line containers with towels or plastic bags to make cleaning easier.

Take stock of what you own.

A lot of the food in your freezer has most likely been there for a long time. Cleaning out your freezer is an excellent time to take stock of all you own.

As you remove the items, make a list of the names and expiration dates of everything you wish to save, and label the containers. Also, check and smell food to see whether it is rotten.

Food spoilage indicators include:

Discoloration that is not typical

noxious odors

Frost or ice on the food contained within the container or packaging

Labels that are no longer in use

Accelerate the defrosting procedure.

After you’ve completed the first few stages, it’s time to let your freezer defrost. If you leave the lid open, this might take many hours. However, if you want to expedite the procedure, follow these steps:

Close the top on a big container of boiling water and place it in the freezer. You may need to refill the hot water many times.

Use a low-heat hairdryer. Keep water away from the dryer to avoid an electrical shock.

Clean your Freezer

Drain your freezer once it has defrosted. Then, clean it out with a gentle cleaner such as dish soap or baking soda and vinegar. The following is how you should clean it:

Fill a dish halfway with water and a tiny quantity of your preferred cleanser.

Wash the inside with a towel dipped in the solution.

Takedown any shelves or baskets and wash them in the sink.

Rinse your freezer to get rid of any cleaner.

Allow it to dry naturally.

Place a package of baking soda inside and shut it for several hours to get rid of any residual odors. You may also put a box of baking soda in the freezer with your food as a preventive step, as long as you replenish it every few months.

Contact us today for professional help.

Call Us: 514.629.0841

Address: Montreal, Quebec, Canada

Mail Us: info@dialcleaningservices.com

READ MORE
oven
Blog Uncategorized
By Fin Dittimi August 11, 2021

HOW TO DEEP OVEN CLEAN

At the heart of each excellent house is a kitchen that welcomes family and friends and serves as a gathering place for wonderful meals and even better memories. The oven, of course, is at the center of that kitchen. The oven is where all of your favorite meals come to life right before your eyes, and it’s also where you wait eagerly to see if your cookies and cakes turned out properly. While your oven provides a lot for you and your family, it is necessary to give it some additional attention from time to time in order for it to stay operating at its best. Cleaning your oven is critical to the health and safety of everyone in your household.

DIY Oven Cleaning

Close up of female hand with yellow protective gloves cleaning oven door

To begin cleaning your oven, gather the following items: an old toothbrush, scourer, oven cleaner, sponges, and rubber gloves. When cleaning your kitchen and oven, strive to use caustic-free cleansers to avoid harmful or dangerous chemicals in your cleaners. Make sure your oven is turned off and cool before you begin. Wear your rubber gloves and cover any gas burner jets before beginning to remove any food, crumbs, or leftovers from the oven.

Next, remove all of the oven shelves and soak them in soapy water. If you have the time, you may soak them overnight.

While the shelves are soaking, spray and clean the oven’s corners with your oven cleaning and sponge. Allow the solution to sit for a few minutes to soften stubborn stains and oil. Before cleaning and drying the oven racks, use your scourer to ensure they are clean.

Make sure you get inside the oven’s corners, where most people overlook spots and residual stains. If required, use an old toothbrush to clean hard-to-reach places. Keep in mind not to get anything electrical wet! During this time, you may also clean your baking trays by soaking and washing them in a sink of hot water and liquid detergent.

The final step is to clean the glass door of your oven.

Again, a scourer can be used to remove stubborn food and oil. Wipe off completely, being careful not to leave any cleaning chemical residue behind.

Making Use of the Self-Cleaning Function

While cleaning your oven using your hands and getting into corners will provide a thorough clean, some people choose to use the self-cleaning option of their oven for comfort and ease. The intense heat of the oven is used in this approach to incinerate residual food particles and oil. Keep in mind that, even if your oven is labeled as self-cleaning, we recommend removing and wiping off as much grease and food as possible before beginning the self-cleaning option.

You will also need to clear up any ashes that remain after the cleaning. While this is a fantastic choice and handy for many, other people are concerned about the gases it may produce and the possible harm caused by such high heat. In general, you should not leave your house while your self-cleaning oven is running. It’s also vital to keep an eye on it and keep young children and pets away from the oven while it’s heating up.

Using Alternative Natural Cleaners

Unlike chemical cleaners (which contain lye and caustic chemicals), homemade or alternative cleaners are far safer to use in your oven, as well as in and around your kitchen and house. It is ideal if you avoid using chemical off-the-shelf cleansers as much as possible because they emit fumes that are damaging to our lungs and health. Use natural cleaning solutions that perform equally as well, such as baking soda, lemon juice, vinegar, and natural soaps, instead.

Keeping it Clean

To make cleaning your oven much easier, try to clean up a bit after each use and avoid allowing messes to accumulate for too long. When stubborn stains emerge, you can use baking soda overnight to remove them. Wipe off the glass screen of your oven after a heavy cooking session, and cover the bottom oven shelf with foil ahead of time to catch any food that falls. Consider using cooking bags to roast meat so that less fat and oil accumulates in your oven on a regular basis.

While it is easy to put off cleaning your oven, maybe this acts as a reminder to do so if you haven’t done so in a while.

Remember to leave your windows open when cleaning, regardless of whatever cleaner you use, to ensure that the space is adequately aired. If you utilize the self-cleaning function, ensure no dogs are around. If you are unclear which procedure to employ or would like to have someone else clean your oven, consider having it professionally cleaned.

It not only saves you time, but it also provides a complete cleaning that is both safe and efficient. Contact us at Dial Cleaning Services today for additional cleaning ideas and information on house and office cleaning.

Contact us today for professional help

Call Us: 514.629.0841

Address: Montreal, Quebec, Canada

Mail Us: info@dialcleaningservices.com

READ MORE
hjiy
Blog Uncategorized
By Fin Dittimi August 9, 2021

The Most Effective Mold Removal Methods for Your Home

It’s unappealing, stinks, and can make you sick. Mold is the absolute last thing you want to discover in your house. However, if discovered immediately, it should be simple to remove on your own. No matter where you find mold in your home, there are safe, efficient methods for removing it from a range of household items and preventing it from returning.

All you need are some simple household materials and a broad grasp of what mold is and what kills mold to restore your home to its previous mold-free condition.

What Is Mold?

First and first, what exactly is this dreadful household pest known as mold? Mold is a fungus composed of microscopic living creatures that flourish in wet settings such as your damp bathroom or basement. Mold and its spores may be found everywhere. There are over 100,000 different forms of mold, and every homeowner finds at least one of them in their house at some point.

Many molds are innocuous, even beneficial, but others are harmful. You don’t want it in your house, anyways. Mold degrades materials, causes allergies, and can make people sick. It also appears to be dirt buildup.

Because mold is a living creature, the best way to get rid of it is to destroy and remove it; otherwise, it will return shortly. You should be able to accomplish this yourself as long as the home mold is limited to a small area.

Bleach versus Vinegar: Which Kills Mold?

Oh no, you’ve discovered mold. What are you going to do? The majority of households will douse it with bleach or a similar cleaning solution. Unfortunately, while these cleansers are harmful to you and your family, they have little effect on mold. Vinegar is the true mold-killer.

When harsh chemicals fail to destroy mold, how does vinegar? Although bleach may remove surface mold, its chemical composition prohibits it from penetrating porous surfaces where mold spores have sunk in deep and formed a protective barrier. It just cannot get to the bottom of the problem.

Vinegar, on the other hand, may enter porous surfaces and attack the molded membrane with its acidity, effectively destroying the whole mold colony so that no surviving spores can replicate and grow again. A moldy surface may be temporarily cleaned with bleach, but vinegar can completely remove it.

How to Get Rid of Mold Using Vinegar and Other Natural Remedies

So, now that you know bleach doesn’t work, you’re probably wondering how to remove mold with vinegar and whether that’s the only option.

Good question! Vinegar is incredibly simple to use on mold, and there are other simple and efficient non-toxic mold killers you may try as well. Here are the finest all-natural mold removal methods:

  1. Vinegar: Simply fill a spray bottle with vinegar and liberally spray the moldy area. Allow the vinegar to rest for at least an hour to perform its magic. Finally, blot the area dry with water with a cloth or paper towels. That’s all!
  1. Hydrogen peroxide: Hydrogen peroxide is an antifungal that acts on hard surfaces comparable to vinegar. Fill a spray bottle with 3 percent hydrogen peroxide, saturate the moldy surface, and let it sit for 10 minutes. Remove any residue by scrubbing the mold and wiping everything down.
  1. Baking soda: This gentle product has the proper pH to destroy mold while being safe for dogs and humans.
  1. Tea tree oil: You may not have this in your cabinet, but it is available at health food stores or online. It is a powerful fungicide that may be used to eliminate mold. In a spray bottle, combine 2 teaspoons of tea tree oil and 2 cups of water. Allow the mold to rest for 24 hours after spraying it. Remove any dead mold that has accumulated.

Contact us today for professional Commercial cleaning and Residential Cleaning Services

Call Us: 514.629.0841

Address: Montreal, Quebec, Canada

Mail Us: info@dialcleaningservices.com

READ MORE
  • 1
  • …
  • 7
  • 8
  • 9
  • 10
  • 11
  • …
  • 14
Featured author image: How to Keep Spiders and Bugs Out Of Your House

Faith Ileh

Hi! I am an author of this blog. Read Our Post

Recent Posts
  • The Best Carpet Cleaning Services in Montreal
    The Best Carpet Cleaning Services in Montreal
    August 14, 2023
  • Experience the Pinnacle of Cleanliness with Dial Cleaning Service
    Experience the Pinnacle of Cleanliness with Dial Cleaning Service
    August 13, 2023
  • Conquer Dusty Corners Like a Pro! ✨🌿
    Conquer Dusty Corners Like a Pro! ✨🌿
    May 31, 2023
dial 2D

Request A Callback

Quick Links

Menu
  • Our Blog
  • Deep Cleaning
  • Montréal
  • Commercial
  • Residential
  • Privacy Policy
  • FAQ

Get In Touch

514.629.0841

  • Business Hours:
  • 8:00 AM – 6:00 PM
  • 7 Days a Week
Copyright © 2026 Dialcleaningservices | design by fandfconsultancy